
Engineered hardwood floors can be sanded and refinished, but how many times you can do it depends entirely on the thickness of the wear layer—the thin slice of real hardwood on top. With a generous wear layer, you might refinish more than once. If it’s on the thinner side, you may only get one shot—or none at all—before risking permanent damage.
When done correctly, refinishing engineered flooring can bring back its original shine, hide years of scuffs, and even give you a fresh stain color. The trick is knowing your floor’s limits before you touch a sander.
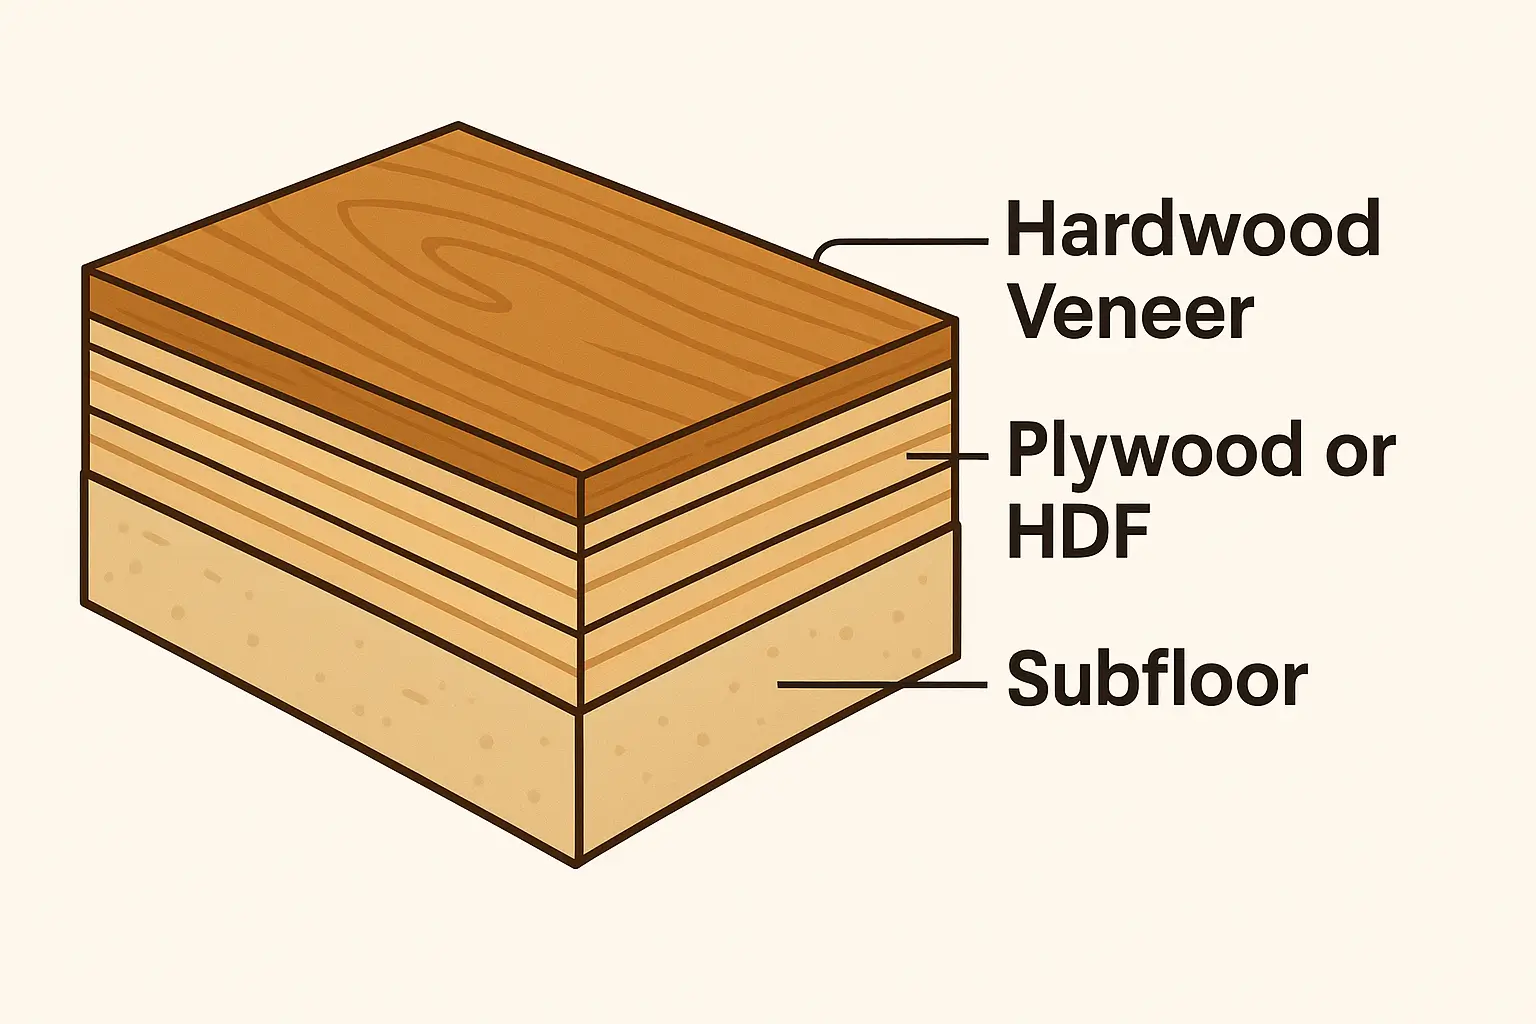
Understanding Engineered Hardwood Construction
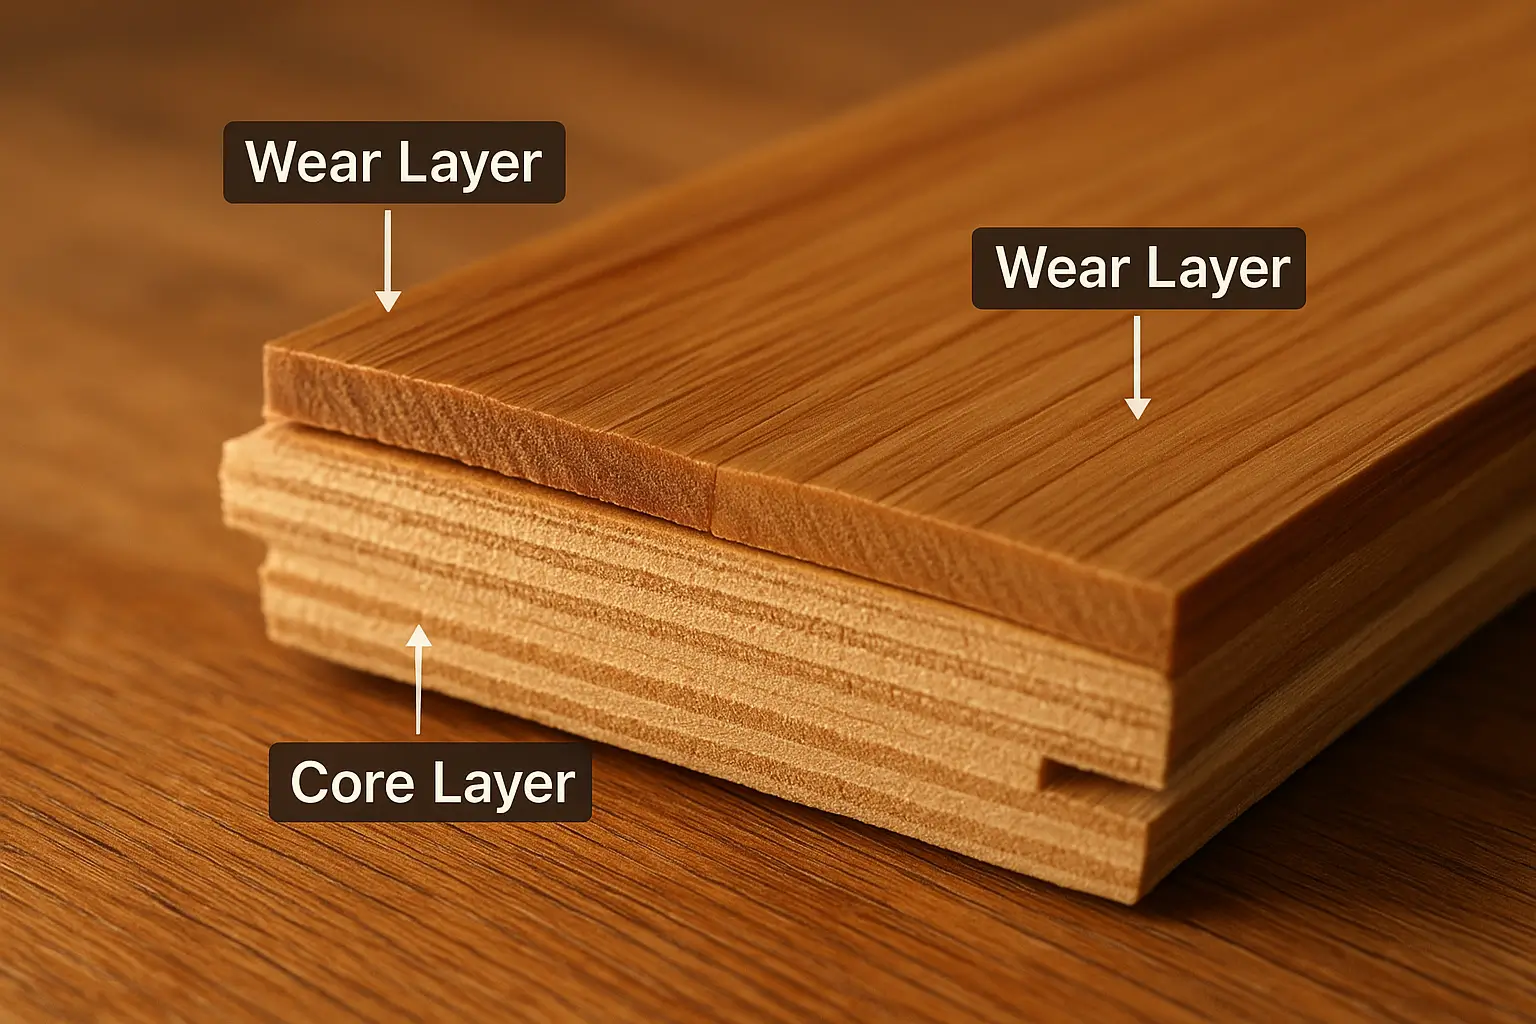
Unlike solid hardwood, engineered flooring is built in layers. The surface is a real wood veneer, and beneath that is a core made from plywood or high-density fiberboard (HDF), arranged in cross layers to prevent warping.
The wear layer’s thickness is the deciding factor — the ANSI/HPVA EF 2020 standards outline national manufacturing requirements for veneer thickness, bonding strength, and moisture resistance.
- Less than 2mm: Too thin for sanding—stick with a light screen and recoat.
- 2–4mm: Usually safe for one refinishing.
- 4–6mm: May allow two or three professional refinishes over its life.
If you’re unsure, check the product details from the manufacturer or measure the veneer at an exposed edge, like a floor register. Knowing this in advance means you can refinish with confidence instead of replacing planks prematurely.
Can You Sand Engineered Hardwood?
Yes, engineered hardwood can be sanded, but only if the wear layer is thick enough to handle it. Sanding removes a thin layer of the wood surface each time, so the goal is to refresh the floor without grinding down to the plywood or HDF core underneath.
Here’s how to know if sanding is an option for your floor:
- Measure the wear layer – If it’s less than 2mm, skip sanding. A light buff and new topcoat is safer.
- Check for damage depth – Surface scratches are fine, but if the dents or stains reach the core, sanding won’t help.
- Review manufacturer guidelines – Many brands, like Shaw or Mannington, clearly state whether sanding is possible.
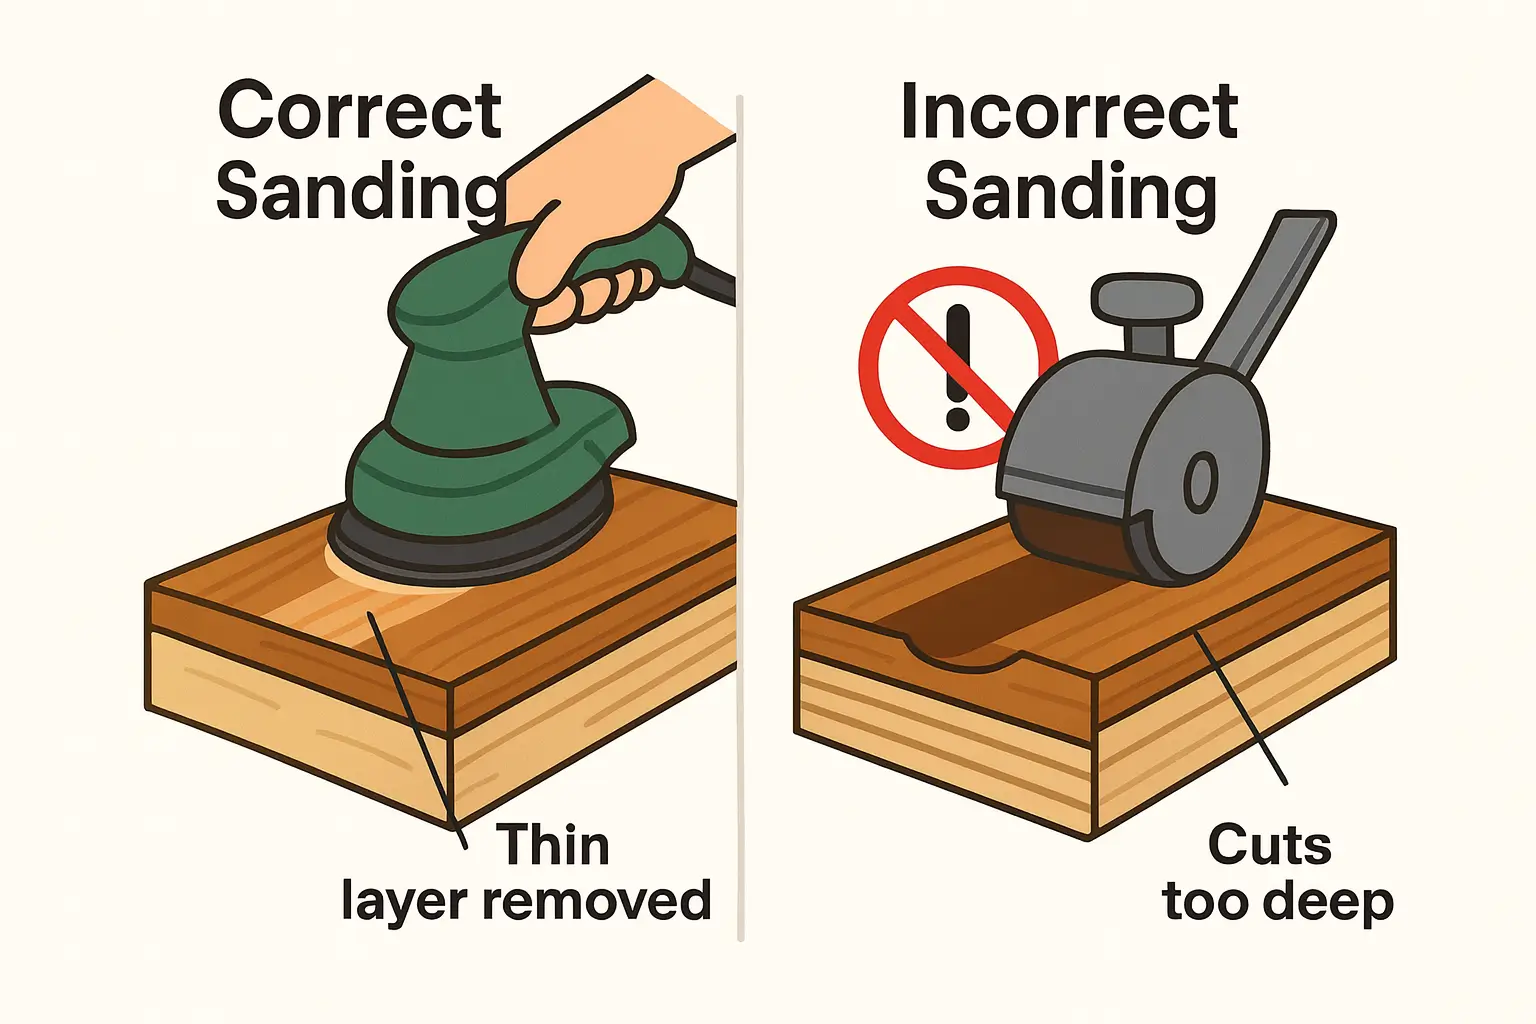
Why sanding engineered wood is different from solid hardwood:
- With solid wood, you have plenty of thickness to work with—engineered floors don’t offer that luxury.
- A drum sander in unskilled hands can cut through veneer in seconds.
- Professionals often use orbital or buffer sanders on engineered floors to remove just enough material without risking the core.
If your floor passes the thickness and condition check, sanding can be a great way to prep it for refinishing and extend its life. If not, you’ll want to look at resurfacing or replacing planks instead.
Refinishing vs. Resurfacing vs. Restaining
| Process | What It Involves | When to Choose It | Pros | Cons |
|---|---|---|---|---|
| Refinishing | Sanding down to bare wood, applying new stain (optional), and adding a protective topcoat. | Deep scratches, discoloration, major wear, or wanting a completely new color. |
|
|
| Resurfacing | Light buffing/abrading of the surface and adding a new finish coat (no deep sanding). | Dull finish, light surface wear, or thin veneer floors that can’t handle full sanding. |
|
|
| Restaining | Sanding to raw wood (if possible) and applying a new stain color before sealing. | When you want a different color and have a thick enough wear layer for sanding. |
|
|
These three terms often get mixed up, but they’re not the same—and choosing the right one can save time, money, and your floor.
Refinishing
Refinishing means sanding the floor down to bare wood, then applying a new stain (if desired) and a protective topcoat. This is the most involved process and is only possible if your wear layer is thick enough to handle sanding. It’s the go-to choice for fixing deep scratches, discoloration, or if you want a completely different floor color.
Resurfacing
Resurfacing skips the heavy sanding. Instead, the floor is lightly abraded (buffed) and then recoated with a fresh layer of finish. It’s faster, less invasive, and safer for thin veneers. Perfect for floors that are dull but not deeply damaged.
Restaining
Restaining is possible when you can sand down to raw wood or use chemical treatments to strip the finish. However, veneer species like maple or hickory may absorb stain unevenly. Going darker is easier than going lighter—especially if the original stain has penetrated deep into the wood fibers.
Quick tip:
If your wear layer is borderline thin, resurfacing is the safest route. If you’ve got at least 3–4mm to work with and want a dramatic color change, refinishing and restaining can deliver a completely new look.
How to Refinish Engineered Hardwood Floors (Step-by-Step)
If your engineered hardwood passes the thickness test, refinishing can breathe new life into it. Here’s how to do it right from start to finish.
1. Inspect and Confirm Thickness
Pull up a floor vent or remove a threshold to measure the wear layer. If it’s under 2mm, stop—choose resurfacing instead to avoid damage.
2. Clear and Prep the Room
Move all furniture, rugs, and décor out. Remove baseboards if you can to prevent scuffing. Vacuum thoroughly so grit doesn’t cause scratches during sanding.
3. Sand Carefully
Use an orbital or buffer sander rather than a heavy drum sander. Start with fine grit (100–120) and move evenly across the floor to avoid sanding through the veneer — according to the U.S. General Services Administration’s refinishing guidelines, no more than 1/16” of the wood surface should be removed when sanding.
4. Clean the Surface
Vacuum again, then wipe down the floor with a damp microfiber or tack cloth. Even small dust particles can ruin the final finish.
5. Apply Stain (Optional)
If changing the color, spread stain evenly with a lambswool applicator or clean rag. Wipe away excess promptly to prevent blotching, especially on tighter-grain species like maple.
6. Apply Finish Coats
Choose water-based polyurethane for faster drying and low odor, or oil-based for a richer tone and extra durability. Apply at least two coats, letting each dry fully before the next.
7. Let It Cure
Follow the product’s cure time before moving furniture back—usually 24–48 hours for light use, and up to a week for heavier traffic.
When You Shouldn’t Refinish Engineered Flooring
Not every engineered floor is a good candidate for refinishing. In some cases, trying can cause irreversible damage and leave you with a costly replacement. Here’s when it’s better to skip it.
1. The Wear Layer Is Too Thin
If the veneer is less than 2mm thick, sanding will likely cut through to the plywood or HDF core. In this case, opt for a light buff and recoat instead.
2. Deep or Widespread Damage
Refinishing can’t fix boards with water damage, warping, or delamination. Once the core is compromised, the only fix is replacement.
3. Severe Pet or Stain Damage
If stains have penetrated beyond the veneer, sanding won’t remove them. Replacing affected boards is often the better option.
4. Structural Issues Below the Floor
Uneven subfloors, loose planks, or moisture problems should be addressed first. Refinishing over these issues will only mask the problem temporarily.
5. Floors With Manufacturer Warnings
Some brands explicitly advise against sanding. Ignoring this can void your warranty and shorten your floor’s lifespan.
Can You Restain Engineered Hardwood?
Yes, you can restain engineered hardwood, but only if the wear layer is thick enough to sand down to bare wood. The process is similar to refinishing, but the goal here is a complete color change rather than just refreshing the finish.
1. Thickness Determines Your Options
If your veneer is 3mm or thicker, sanding down to raw wood for a new stain is generally safe. Thinner layers (2mm or less) leave little margin for error, and restaining may not be possible.
2. Going Dark vs. Going Light
It’s much easier to stain a floor darker than to make it lighter. Lighter colors often require bleaching or removing every trace of the previous stain—both tricky with thin veneers.
3. Species and Stain Absorption
Open-grain woods like oak absorb stain evenly, making color changes smoother. Tight-grain species like maple or hickory can appear blotchy unless treated with a pre-stain conditioner.
4. Prep and Application Tips
After sanding, apply the stain evenly with a lambswool applicator or lint-free rag. Wipe away excess quickly to avoid uneven drying and streaks.
5. When Restaining Isn’t Worth It
If the veneer is too thin, the existing stain is too deep, or the floor has structural damage, replacing planks might be more cost-effective than attempting a restain.
Costs and Timeframes in the US
Refinishing engineered hardwood isn’t just about the labor—it’s about knowing whether the investment makes sense for your floor’s remaining lifespan. Here’s what most US homeowners can expect.
1. Average Refinishing Costs
Professional refinishing for engineered hardwood typically runs between $3 and $6 per square foot, depending on your location, floor condition, and chosen finish. Thicker veneers that require more sanding time will usually fall on the higher end.
2. DIY Cost Breakdown
Renting an orbital sander for a weekend averages $50–$80, with an additional $30–$50 for sandpaper. Stain and polyurethane can add another $60–$120. While cheaper than hiring a pro, one mistake with a sander could ruin your veneer. Hiring a certified professional also ensures compliance with workplace safety — OSHA classifies floor refinishing and sanding under official contractor activities, making it subject to federal safety regulations and best practice standards.
3. Restaining Price Range
If you’re changing the color, expect a slight bump in cost—usually an extra $0.50–$1.50 per square foot—due to the extra sanding precision and stain application.
4. Time Required
- Professional: Usually 2–4 days from prep to final coat, plus cure time.
- DIY: Can stretch to 4–6 days, especially for first-timers.
5. Cure Time Before Use
Light foot traffic is generally safe after 24–48 hours, but wait a full 5–7 days before moving heavy furniture or rugs back to prevent finish damage.
Light-Colored Engineered Hardwood Refinishing
Light-colored engineered hardwood can look stunning, but refinishing it comes with its own set of challenges. The goal is to keep the fresh, airy feel without introducing uneven tones or visible sanding marks.
1. Why Light Colors Are Tricky
Lighter stains and natural finishes highlight imperfections, so any uneven sanding or leftover scratches will stand out more than on darker floors.
2. Surface Prep Matters Most
Extra sanding passes with fine-grit paper (120–150) help create a smooth, uniform surface. Skipping this step can leave swirl marks that are impossible to hide.
3. Choosing the Right Finish
Water-based polyurethane works well for pale floors because it won’t yellow over time. Oil-based finishes can add warmth but may shift the tone slightly toward amber.
4. Going from Dark to Light
Switching from a dark stain to a light one is difficult on engineered flooring. The veneer must be thick enough to sand away all traces of the old color—otherwise, the darker tones can bleed through.
5. Protecting the Look
Light floors show dirt and wear faster, so use area rugs in high-traffic areas and clean with a microfiber mop regularly to maintain that bright, clean appearance.
Maintenance After Refinishing
A good refinishing job can last years—but only if you care for it properly. The right maintenance keeps the finish intact and prevents you from having to refinish sooner than necessary.
1. Clean the Right Way
Use a microfiber mop and a hardwood-safe cleaner. Avoid steam mops and excessive water—moisture is the enemy of engineered wood.
2. Protect High-Traffic Zones
Add rugs or runners in busy areas like entryways and hallways. Felt pads under furniture legs prevent dents and scratches when things get moved.
3. Maintain the Finish
Every 3–5 years, consider a light buff and recoat to refresh the protective layer before wear reaches the wood veneer.
4. Control Indoor Climate
Keep humidity between 35%–55% year-round. Too dry and boards may shrink; too humid and they can swell or cup.
5. Act Fast on Spills
Clean up liquids immediately to prevent staining or moisture damage to the core layers. Even small amounts can seep into seams if left too long.
Engineered Hardwood That Can Be Refinished More Than Once
Not all engineered floors are a one-and-done when it comes to refinishing. If you choose the right product from the start, you can extend the life of your floor by decades.
Floors with a wear layer of at least 4mm can typically be sanded and refinished two or even three times without risking damage to the core — a threshold supported by the National Wood Flooring Association’s Refinishable Program, which sets clear benchmarks for engineered hardwood wear layers. Premium engineered products—especially those designed for high-end residential use—often use a thicker veneer specifically for this reason.
Examples of Refinish-Friendly Options
- Shaw: Certain collections, like Shaw Expressions, offer 4mm veneers and manufacturer approval for multiple refinishes.
- Mannington: Some lines feature 5mm wear layers that rival solid hardwood for longevity.
- Bruce: Select engineered planks have a 3–5mm wear layer and clear refinishing guidance in their documentation.
If you’re shopping for new floors and refinishing potential matters to you, always check the manufacturer’s technical specs. A thicker wear layer may cost more upfront, but it can save thousands over the lifetime of your home.
FAQ: Engineered Hardwood Refinishing
Can engineered hardwood be refinished more than once?
Yes, if the wear layer is at least 4mm thick, it can usually be refinished two to three times. Thinner veneers may only allow one refinishing—or none at all.
Can you sand engineered floors without damaging them?
Yes, but only with the right equipment and technique. Professionals often use orbital sanders instead of heavy drum sanders to avoid cutting through the veneer.
What’s the thinnest engineered floor you can refinish?
Generally, anything under 2mm isn’t safe to sand. A light buff and recoat is the better option for very thin veneers.
Is it cheaper to refinish or replace engineered hardwood?
Refinishing is usually more affordable—often $3–$6 per square foot—compared to $8–$15 for new installation.
Can you change engineered hardwood from dark to light?
Yes, but only if the veneer is thick enough to remove all traces of the dark stain. Otherwise, you risk uneven color or bleed-through.