
Notice flaking paint near the skirting board? Maybe that telltale musty smell at the base of a wall? If so, you might be facing rising damp—and no, airing the room won’t fix it.
Damp proof course (DPC) injection is one of the most common solutions used in UK homes. It’s far less disruptive than stripping out walls and can be surprisingly cost-effective. But if you’ve seen terms like “damp proof cream,” “chemical DPC,” or “damp injection kit” online, you’re probably wondering what any of it actually means.
This guide will walk you through the entire process—what DPC injection is, how it works, how much it costs, and whether you can tackle it yourself. Whether you’re renovating an older property or just spotted some rising damp, you’ll get clear answers to help you make an informed decision.
What Is a Damp Proof Course (DPC) and Why It Matters
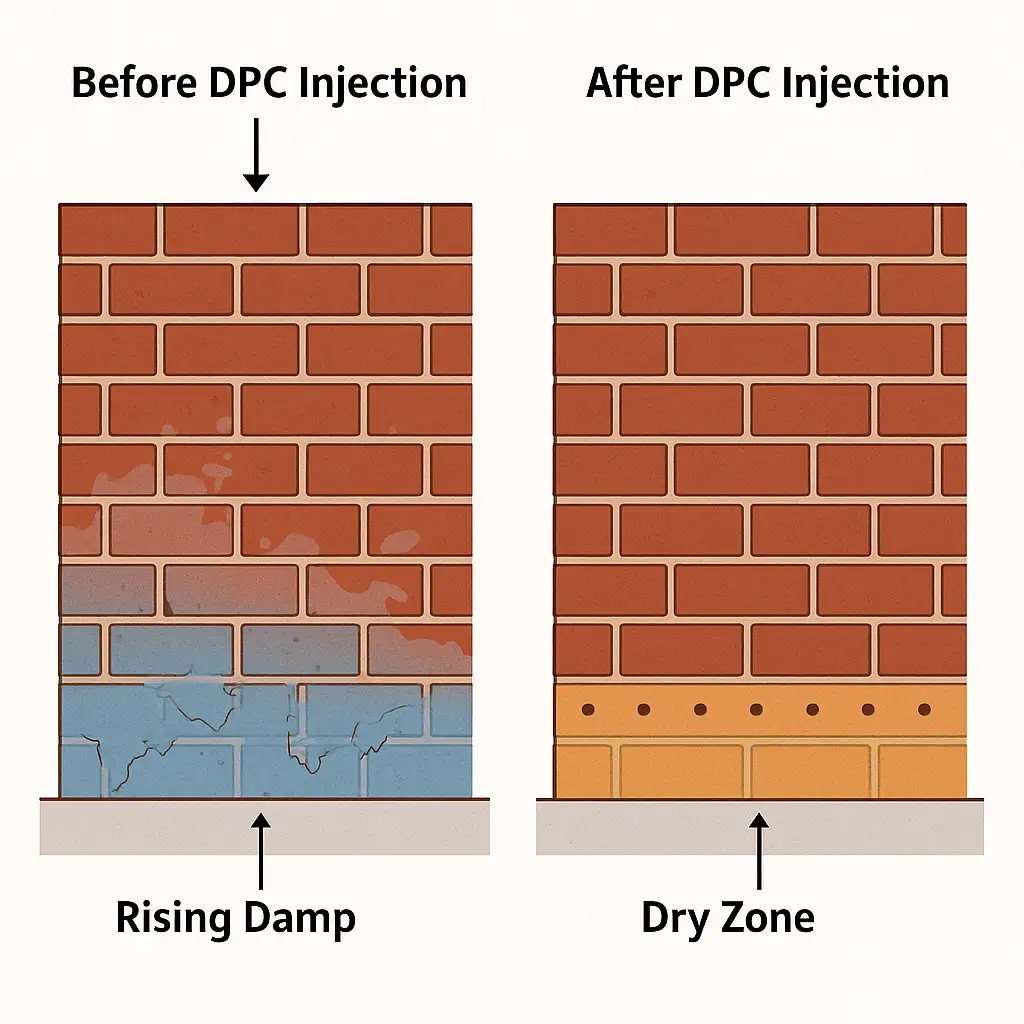
A damp proof course (DPC) is a moisture barrier that’s built into your walls to stop water from creeping up from the ground. Without it, brick and mortar act like a sponge—drawing water up through capillary action. That’s when you start seeing salt marks, peeling paint, or worse, rot.
How DPC Works in UK Homes
In the UK, DPC installation is mandated under Building Regulations Part C. But plenty of homes—especially those built before the 1950s—still suffer from missing or broken damp courses. Even newer properties can run into problems if the DPC is compromised during renovations, as noted in the Property Care Association’s guidance.
There are two main types: physical and chemical. Physical DPC is a layer of slate or plastic built into the wall. But for most existing homes, chemical DPC—applied as an injectable cream—is the preferred modern option. It’s less invasive, faster to apply, and highly effective when installed correctly.
Understanding Rising Damp: Causes, Signs & Risks
Rising damp isn’t just an eyesore—it’s a sign that moisture is travelling up through your walls from the ground. And once it starts, it rarely stops on its own.
What Causes Rising Damp?
It usually happens when the original damp proof course is missing, damaged, or bridged. That means there’s nothing blocking groundwater from seeping up through the porous materials in your walls—like bricks and mortar. According to the Property Care Association, this capillary action can draw moisture up to one metre high.
This is especially common in older UK homes where the DPC was never installed or has degraded over time. But even in newer properties, changes to landscaping, paving, or internal alterations can compromise the existing barrier.
Common Signs You Might Have It
- Flaking or bubbling paint near the floor
- Tide marks or yellow/brown staining on internal walls
- White, powdery salt deposits (known as efflorescence)
- Musty smell at floor level
- Damp or rotting skirting boards and floorboards
These signs usually appear from the ground up, typically no higher than a metre. If the damp is higher, you may be looking at condensation or penetrating damp instead.
Why It’s a Problem You Shouldn’t Ignore
Damp doesn’t just look bad. It ruins plaster, weakens structural timbers, and fosters mould. In fact, the Office for Health Improvement and Disparities links prolonged exposure to damp and mould with respiratory problems. Left untreated, it can reduce property value and even make your home harder to sell.
DPC Injection: The Modern Chemical Solution
When a physical DPC is compromised, DPC injection is recommended as a reliable alternative by the Building Research Establishment (BRE). This method uses damp proof cream or liquid injected into the base of the wall to form a waterproof barrier. It’s faster, cleaner, and far less disruptive than older methods like removing bricks or installing a new physical barrier.
What Is Chemical Damp Proofing?
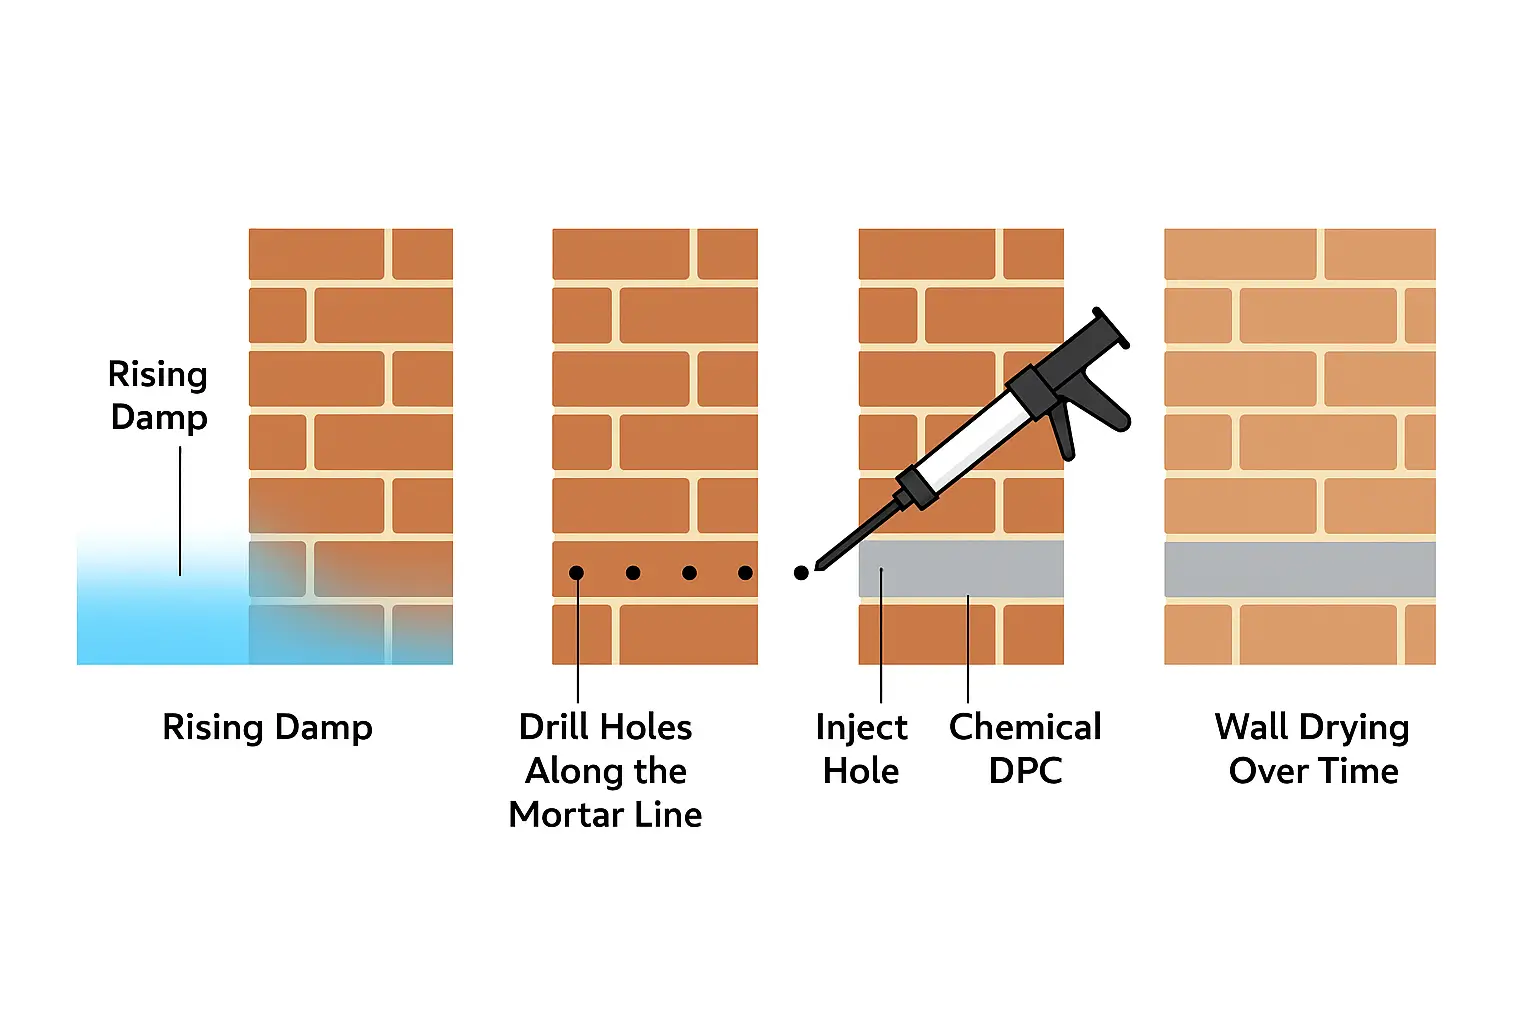
Chemical DPC involves injecting a specialised damp proof cream or liquid directly into holes drilled along the base of affected walls. Once injected, the substance spreads through the masonry and cures to form a water-repelling barrier. This blocks moisture from travelling upwards.
The most common products used are:
- DPC Cream – Thick, gel-like substances that are easy to inject and spread slowly through the wall.
- Liquid DPC – Thinner fluids that require pressure injection and may suit more porous materials.
- Damp Proofing Sprays – Sometimes used for surface-level treatment but rarely enough for rising damp.
How Injection DPC Works in Practice
Here’s a quick overview of the typical process:
- Holes are drilled into the mortar joint at regular intervals, usually just above ground level.
- The cream or liquid is injected using a manual or electric applicator.
- Over time, the substance spreads and lines the pores of the masonry.
- Once cured, it acts as a permanent chemical barrier against water rising from below.
Brands like Ultracure and Dryzone, as well as Screwfix DPC Cream, are commonly used in the UK and often come with certification to show they meet British Standards.
Is It a Permanent Fix?
If applied correctly and combined with proper aftercare (like replastering with salt-resistant materials), a chemical DPC can last for decades. It’s not an instant cure—you’ll need to give walls time to dry out—but it’s a proven long-term solution for tackling rising damp internally.
How Damp Proof Cream Works
Damp proof creams are one of the simplest and most effective ways to stop rising damp in its tracks. They’re widely used across the UK because they don’t require pressurised equipment and can be used on most masonry walls.
What’s in DPC Cream?
Most damp proof creams are made from silane or siloxane-based materials—water-repellent chemicals that penetrate the pores of brick and mortar. These ingredients react with the moisture in the wall and form a hydrophobic (water-repelling) layer inside the masonry.
The consistency is similar to toothpaste—thick enough to stay where it’s applied, but soft enough to move through the structure over time.
The Installation Process
Installing DPC cream is straightforward:
- Holes are drilled horizontally into the mortar course at regular intervals (usually 10–12mm wide and 120mm deep).
- The cream is injected using a hand gun or applicator until the hole is full.
- The holes are then sealed with mortar or plugs.
- Over the next few days, the cream spreads and cures to form a continuous damp proof barrier.
No pressure pumping, no complicated equipment—just a drill and an applicator.
Where It Works Best
DPC cream works on:
- Solid brick walls
- Cavity walls (if both sides are treated)
- Stone walls (though injection patterns may vary)
It’s ideal for internal rising damp treatment and is often paired with re-plastering using a salt-retardant render to ensure no old damage reappears.
DPC Cream vs Liquid DPC vs Spray: What’s the Difference?
| Feature | DPC Cream | Liquid DPC | Damp Proofing Spray |
|---|---|---|---|
| Form | Thick cream | Thin liquid | Aerosol or pump spray |
| Application method | Injected with a hand gun | Requires pressurised pump | Sprayed on surface |
| Ease of use | Very user-friendly, ideal for DIY | Requires specialist tools | Easiest, but limited use |
| Suitable for | Brick, block, cavity walls | Highly porous masonry | Surface-level damp or condensation |
| Penetration | Spreads slowly and evenly | Deep penetration, less control | Stays on surface, limited depth |
| Drying/curing time | Several days to fully cure | Cures quicker with pressure | Instant or quick drying |
| Effectiveness for rising damp | ✔✔✔ Strong barrier for long-term protection | ✔✔ Effective with professional setup | ✔ Surface-only, not for rising damp |
| Mess and clean-up | Minimal mess | Can be messy and tricky to handle | Low mess, but not suitable for full treatment |
| Cost | Mid-range (kits widely available) | Higher due to equipment costs | Cheap, but short-term |
Comparison Table: DPC Cream vs Liquid DPC vs Spray
With so many damp proofing products on the market, it’s easy to get overwhelmed. DPC liquids, creams, and sprays all promise to stop rising damp—but they don’t work in the same way or offer the same level of protection.
DPC Cream: Reliable and User-Friendly
DPC cream is by far the most popular choice for UK homeowners and professionals. It’s thick, easy to apply with a hand gun, and doesn’t run or drip inside the wall. The cream slowly disperses through the brickwork and forms a consistent waterproof layer.
Best for:
- DIY use
- Solid and cavity brick walls
- Low mess and easy clean-up
Liquid DPC: Older but Still Used
Liquid DPC is thinner and usually requires pressure injection. This means a specialised pump is needed to force the liquid deep into the wall. While effective, it’s messier and less predictable in terms of how evenly it spreads.
Best for:
- Very porous materials
- Large-scale professional jobs
- Where deeper penetration is needed
Damp Proofing Spray: Surface-Only Solution
Some products sold as “damp proof sprays” are really for surface damp, condensation, or minor waterproofing—not rising damp. These might help temporarily with musty smells or minor patches but won’t treat damp that’s coming up from the ground.
Best for:
- Mild condensation problems
- Temporary surface sealing
- Walls with no rising damp
Choosing the Right Option
If you’re dealing with true rising damp, a DPC injection cream is usually the safest bet—especially if you’re doing the job yourself. It’s more forgiving to apply and is specifically designed to create a durable chemical barrier inside the wall structure.
DIY Damp Proofing: Can You Do It Yourself?
Hiring a specialist isn’t always necessary—especially if the job is small and you’re reasonably handy. In fact, many UK homeowners successfully install a chemical damp proof course themselves using a DPC injection kit.
What’s in a Typical DIY Damp Proofing Kit?
Most kits include everything you need for a small-to-medium wall area:
- DPC cream tubes or cartridges (often around 600ml each)
- A manual or cartridge applicator gun
- Drill bit suitable for masonry
- Simple instructions (some include plugs or filler)
You’ll need your own drill and ideally some safety gear like gloves, goggles, and a dust mask.
Step-by-Step: How to Inject Damp Proof Cream Yourself
- Mark the Injection Line – Usually 150mm above ground level or the lowest accessible mortar joint.
- Drill Holes – At regular intervals (usually every 100–120mm) and to a depth of 100–120mm depending on wall thickness.
- Inject Cream – Fill each hole slowly from the back to the front using a consistent, steady squeeze.
- Seal the Holes – Use mortar, plugs, or leave open temporarily depending on plastering plans.
- Allow to Cure – The cream spreads and reacts with moisture over the next few days.
Things to Keep in Mind
- You’ll still need to replaster walls with a salt-resistant mix if damp has caused staining or crumbling.
- Don’t rush to redecorate—the wall will need time to dry, often several weeks depending on how wet it was.
- If you spot damp higher than one metre, or on internal partition walls, it might not be rising damp—get a proper diagnosis.
DIY damp proofing can save hundreds of pounds—but it’s only effective if the product and method comply with approved trade standards, like those set out by TrustMark (TrustMark) and the Property Care Association (PCA). Always follow the manufacturer’s instructions and make sure you’re actually dealing with rising damp, not condensation or leaks.
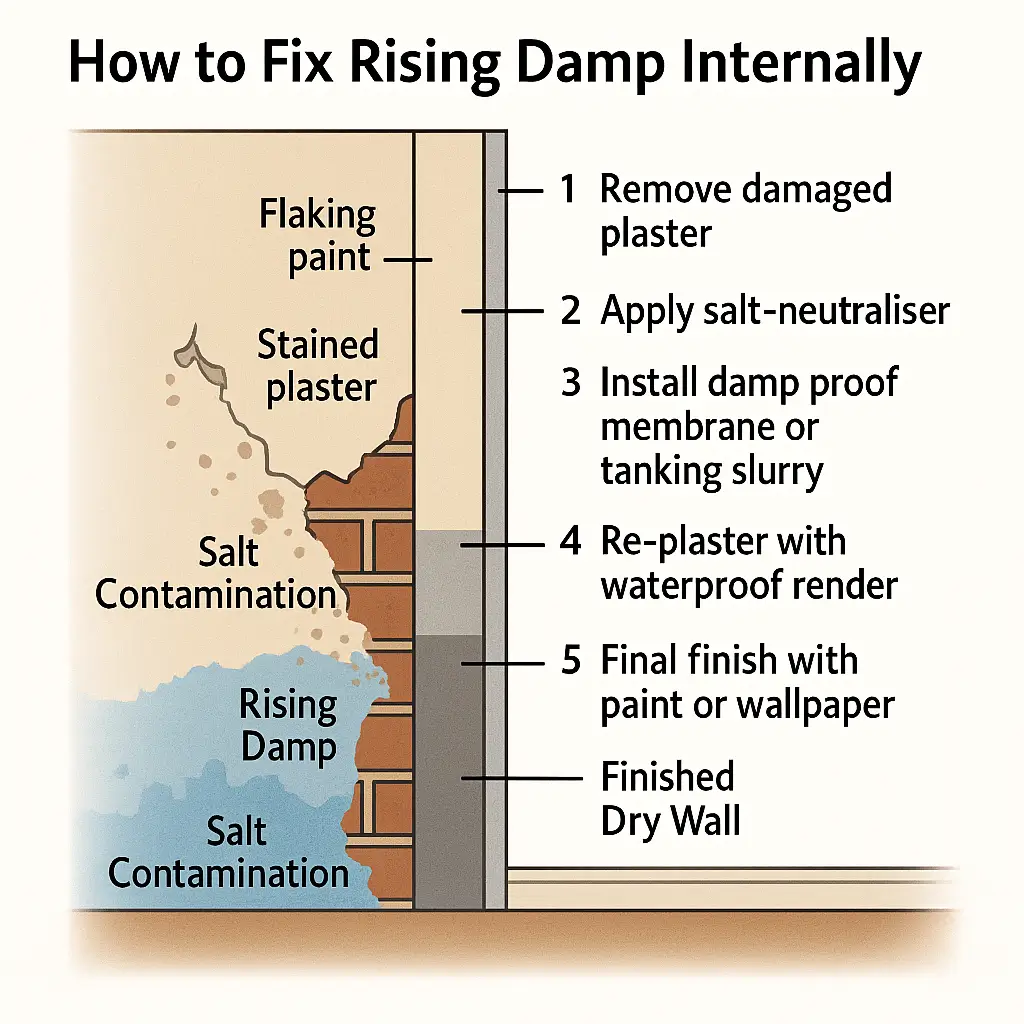
How to Fix Rising Damp Internally
Once you’ve treated the source of rising damp with a DPC injection, the next step is restoring your internal walls. If you’re unsure where to start, here’s a full guide on how to treat damp walls internally that explains each step clearly. This isn’t just about painting over the damage—it’s about making sure the damp doesn’t return and the finish holds up. If you’re considering repainting damp-affected areas, it’s worth reading this guide on damp proof paint to understand when it helps—and when it doesn’t.
Step 1: Let the Wall Dry Out
After injection, the wall will take time to fully dry. As a rough guide:
- 1 month per inch of wall thickness is typical.
- Use ventilation, dehumidifiers, or gentle heating to help (but don’t blast it with heat).
Trying to redecorate too early can trap moisture behind paint or plaster, causing damage to return.
Step 2: Remove Damaged Plaster
If your wall has blown plaster, salt stains, or a crumbly texture, it’s best to remove it back to the brickwork—usually up to 1.2m high. This approach is consistent with guidance from organizations like the Property Care Association, which recommends removing and replacing contaminated plaster to eliminate hygroscopic salts. This gives you a clean surface to work with and removes salt deposits that can keep drawing in moisture.
Step 3: Apply Salt-Resistant Replastering
Use a specialist render additive or pre-bagged renovating plaster—especially in heritage properties—something Historic England recommends to protect against unnecessary moisture damage (Historic England). These resist hygroscopic salts (the white stuff) and help prevent future surface damage.
If you’re not plastering straight away, you can:
- Use a damp proof membrane or
- Leave walls exposed until fully dried before applying a breathable finish
Step 4: Choose the Right Finishes
- Use breathable paints like mineral or lime-based options rather than vinyl emulsions.
- Avoid wallpapering for at least 6–12 months after treatment.
With the right aftercare, DPC injection combined with internal restoration provides a long-lasting fix—and helps avoid future issues from condensation or trapped moisture.
Cost of Damp Proof Course Injection in the UK
Wondering how much DPC injection will set you back? For a full breakdown of UK-wide price ranges, labour, and hidden costs, check out our UK damp proofing cost guide. The cost can vary depending on your wall size, type of property, and whether you go DIY or hire a professional.
Typical Price Range
- Professional DPC injection:
You can expect to pay £60–£100 per metre of wall treated, including labour, materials, and initial prep work.
For an average semi-detached home, that could mean a total of £400 to £1,200, depending on the area and severity of the damp. - DIY damp proof injection kits:
A full kit from Screwfix, Dryzone, or similar brands costs between £40 and £90, covering roughly 10–12 metres of wall.
Keep in mind: DIY kits are cost-effective if you’re treating a small area, but may not be suitable for large or complex jobs.
What Affects the Price?
- Wall thickness and type – Thicker walls or random stonework may need deeper injections or more cream.
- Access issues – Removing built-in furniture or working behind radiators adds to labour.
- Extent of internal damage – Plaster removal, re-rendering, and painting aren’t always included.
- Location – Prices vary across the UK. Expect higher rates in London and the South East.
Is It Worth Paying for a Professional?
If you’re unsure about the cause of damp, or dealing with multiple affected areas, it’s usually worth getting a survey and quote. Reputable companies often offer guarantees of 20–30 years, which is hard to match with a DIY job.
Choosing the Right Damp Proofing Product
Not all damp proof creams or kits are the same. Picking the right one can make the difference between a long-term fix and a quick patch-up that fails in six months.
What to Look for in a DPC Cream
When buying a damp proof cream, check for the following:
- BBA certification – This is a vital seal of approval from the British Board of Agrément, showing the product has been independently tested to meet UK building standards.
- High active ingredient content – Typically silane or siloxane, the higher the percentage, the better the performance.
- Ease of use – Some come ready to use in cartridges, while others need transferring into an applicator.
- Wall compatibility – Make sure it suits your wall type (solid, cavity, or stone).
Well-known brands like Ultracure, Dryzone, and Permaguard are widely trusted by UK professionals.
Best Places to Buy DPC Products in the UK
You can find high-quality DPC creams and injection kits at:
- Screwfix – Affordable, popular DIY option with brands like No Nonsense and Dryzone
- Amazon UK – Wide selection, but check product ratings and seller credentials
- Toolstation, Wickes, and Selco – Good for in-person purchase and advice
- Specialist damp proofing suppliers – Often carry higher-grade or trade-only products
If you’re doing a large job or multiple walls, look for bulk packs or kits that include a drill bit, applicator, and plugs.
What Is DPC Material Made Of?
DPC cream is typically made from water-based emulsions containing silane/siloxane compounds. These materials bond with the masonry and form a chemical barrier that stops water from moving upward. Unlike surface waterproofers, they create an internal line of defence.
Professional Damp Proofing vs DIY: When to Call an Expert
DIY DPC injection works well for many homeowners—but it’s not always the right call. In some situations, hiring a professional can save time, prevent costly mistakes, and give you a more reliable outcome.
When DIY Works Fine
You can confidently do the job yourself if:
- The damp is limited to a single wall or small area
- The wall is standard brickwork in good condition
- You’re comfortable using a drill and applicator gun
- The internal damage is minor or already stripped back
Many UK homeowners fix minor rising damp issues themselves using Screwfix or Dryzone kits—with solid results when done properly.
When It’s Best to Get a Specialist In
Call a damp proofing expert if:
- You’re unsure whether it’s rising damp or something else (e.g., condensation or a leak)
- There’s damage across multiple rooms or external walls
- The property has stone, rubble-filled, or cavity walls that may need specific treatment
- You’ve treated it before and the problem keeps coming back
Professionals not only install the DPC but also assess ventilation, drainage, and other moisture risks. Most also offer long-term guarantees (up to 30 years), which can be reassuring if you’re planning to sell the property.
Finding Trusted Help
When seeking professional help, search for qualified damp specialists through reputable schemes like TrustMark or the Property Care Association (PCA). These organizations hold their members to high standards of quality and consumer protection, often offering long-term guarantees on their work for peace of mind.
Make sure the contractor includes a full damp survey and breakdown of the work. Don’t just go with the cheapest quote—go with experience and reputation.
Aftercare: What to Do After Injection DPC
Injecting DPC cream is only part of the solution. To make sure your walls stay dry long-term, you’ll need proper aftercare—especially inside the home.
Let the Walls Breathe
Once the cream is injected, give the wall time to dry out naturally. This can take several weeks or even months depending on how damp it was to begin with. A good rule of thumb: 1 month of drying per inch of wall thickness.
During this time:
- Keep windows open where possible
- Use a dehumidifier in very damp areas
- Don’t paint or wallpaper too soon—it can trap moisture underneath
Replastering the Right Way
If plaster was removed, you’ll need to re-plaster using salt-resistant materials. These are specially formulated to block hygroscopic salts that rising damp brings to the surface.
You can either:
- Use a renovating plaster or
- Apply a waterproof damp-proof membrane before standard plaster
Avoid using standard gypsum plaster—it often fails on damp-treated walls.
Finishing Touches
- Use breathable paints, like mineral or lime-based options
- Wait 6 to 12 months before applying wallpaper
- Don’t block wall vents—keep airflow moving through the room
With the right care after injection, your damp problem shouldn’t return. But keep an eye out for other sources of moisture, like condensation or external leaks, that can mimic or worsen the issue.
After injecting the DPC, follow up with careful internal restoration. The UK Government IWI Guidance advises letting the wall dry fully before plastering or insulating. Replaster using specialist renders or membranes that resist hygroscopic salts, as advised in the PAS 2035:2023 Retrofit Design Guide.
Rising Damp FAQs
How Do I Stop Rising Damp for Good?
The most reliable way to stop rising damp permanently is to install a working damp proof course—usually via chemical DPC injection. Combined with salt-resistant replastering and good ventilation, this stops ground moisture from moving into your walls again.
Can Rising Damp Be Cured Without Injection?
If your home already has a working DPC that’s been bridged (e.g. by high garden soil or internal render), simply removing the bridge might fix the issue. But if the DPC has failed or is missing, chemical injection is the most practical fix.
How Long Does Damp Proofing Last?
A properly installed DPC cream can last 25–30 years, and most professional installers offer long-term guarantees. However, if the wall is poorly prepped or the wrong material is used, the effect may not last nearly as long.
Can Rising Damp Come Back After Treatment?
Yes, if:
- The injection wasn’t done correctly
- Replastering didn’t remove salt contamination
- Other moisture sources weren’t addressed (like leaking gutters or poor drainage)
That’s why diagnosis and aftercare are just as important as the injection itself.
Will DPC Injection Work on All Wall Types?
It works best on standard brickwork. Cavity walls, stone, or rubble-filled walls may need different drilling patterns or specialist products, but many can still be treated with the right approach.
Is DPC Cream Safe?
Yes. Most DPC creams are water-based and low in toxicity, making them safe to use in homes—including those with children and pets—if applied correctly. Always follow the product instructions and wear basic safety gear when drilling and injecting.
Conclusion: Damp Injection Done Right
Rising damp might feel like one of those problems that spirals quickly—but with the right approach, it’s entirely manageable. For many UK homes, a chemical damp proof course is the most practical solution. It’s clean, cost-effective, and doesn’t involve tearing your walls apart.
Whether you go DIY with a Screwfix kit or hire a professional, the key is doing it right: correct drilling depth, good quality cream, proper drying time, and salt-resistant replastering. And don’t overlook ventilation or external issues like gutter leaks—they often go hand-in-hand with damp.
Treat it once, treat it well, and you won’t be dealing with musty walls or peeling paint again anytime soon. Your home stays dry, healthier, and far more comfortable—exactly how it should be.